This comprehensive guide breaks down everything you need to know about choosing affordable recording gear. We will explore top-tier interfaces that deliver crystal-clear sound, compare their standout features, and dive into the technical specs that actually matter. You will also learn about common setup mistakes, discover expert tips to maximize your sound, and find answers to the most frequently asked questions. By the end, you will know exactly which interface suits your specific creative needs.
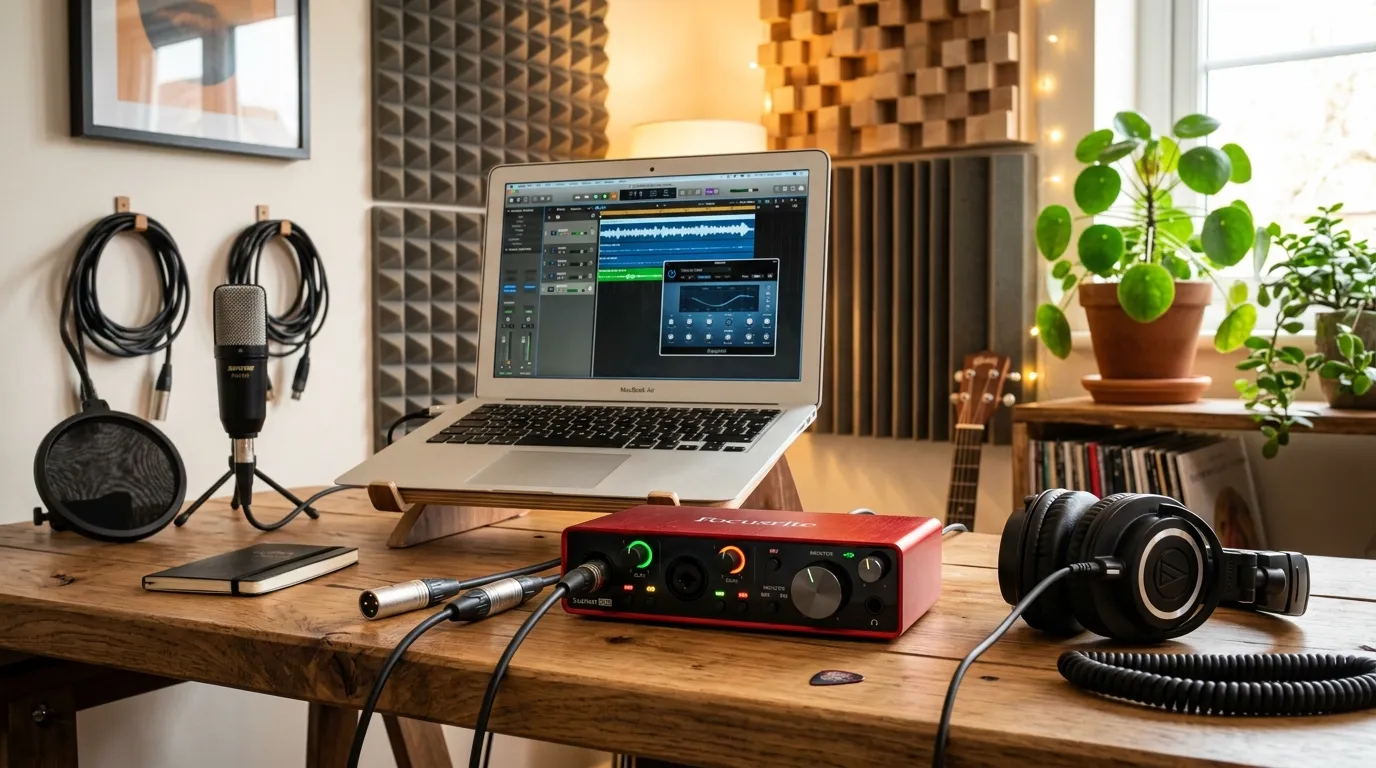
Have you ever recorded a vocal track or guitar riff, only to play it back and hear a muddy, delayed mess? You are not alone. Building a recording space often feels like an expensive puzzle, but the core of that puzzle does not have to drain your wallet. Choosing the right gear is the foundation of pristine sound quality. If you want to elevate your tracks from amateur to professional, finding the best budget audio interface for home studio recording is your crucial first step. Let us explore how you can capture studio-quality sound on a shoestring budget.
Why Your Studio Needs a Dedicated Interface
When you first start making music, plugging a USB microphone directly into your laptop seems like the easiest route. However, standard computer sound cards are built for basic playback, not for capturing high-fidelity audio. An audio interface acts as the essential bridge between your analog instruments and your digital audio workstation (DAW).
It handles the heavy lifting of converting analog signals into digital data and vice versa. More importantly, it provides the necessary power (phantom power) for high-quality condenser microphones and significantly reduces latency—that annoying delay between playing a note and hearing it in your headphones. Upgrading your interface is the single most effective way to improve your music production workflow.
Top Contenders for Your Studio
Navigating the sea of available gear can be overwhelming. We have narrowed down the top affordable options that deliver uncompromising quality.
1. Focusrite Scarlett 2i2 (4th Gen)
The Focusrite Scarlett series is practically synonymous with home recording. The 4th generation 2i2 offers two XLR/instrument combo inputs, making it perfect for recording a vocal and guitar simultaneously. Its preamps are incredibly clean, offering a transparent sound that captures the true essence of your performance.
- Best for: Singer-songwriters and podcasters.
- Standout Feature: The “Air” mode adds high-end clarity, mimicking classic studio consoles.
2. M-Audio M-Track Duo
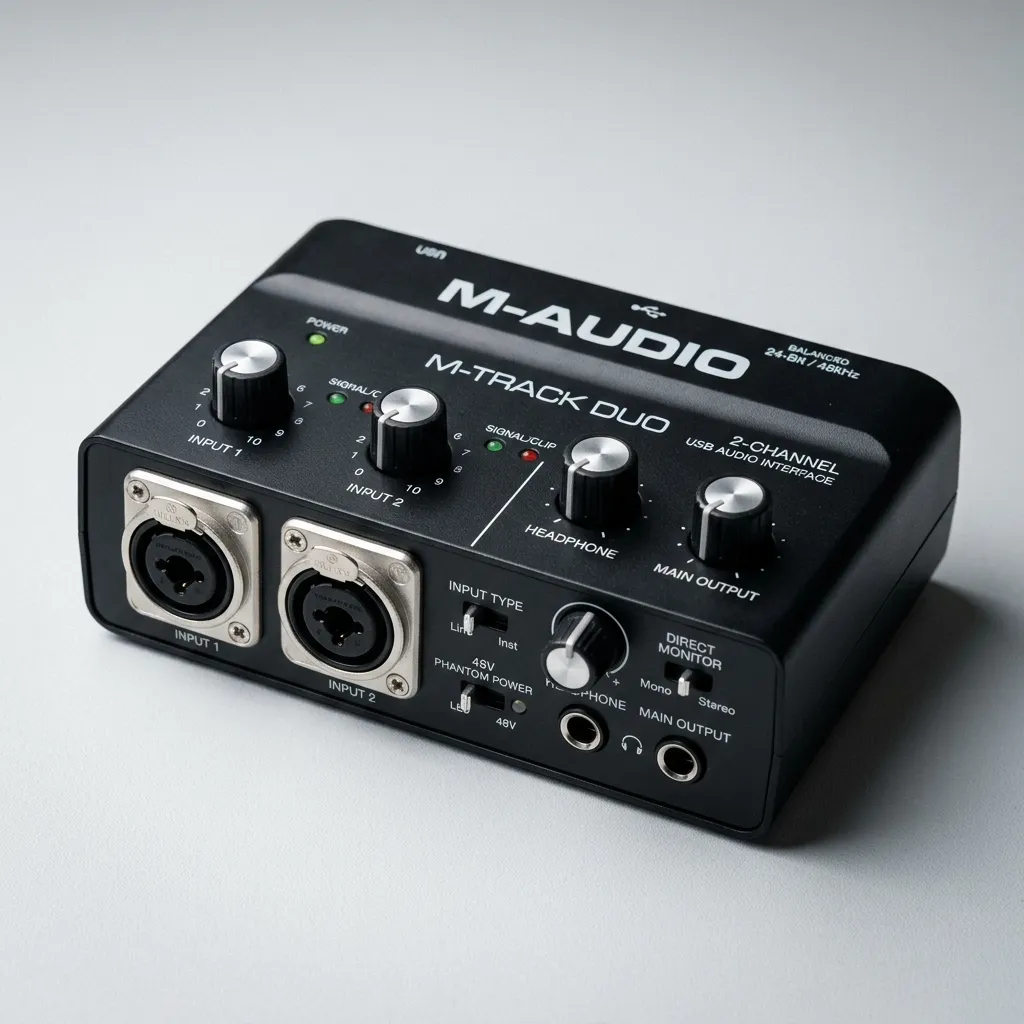
If your budget is exceptionally tight, the M-Audio M-Track Duo is a phenomenal choice. It provides two combo inputs and essential direct monitoring for zero-latency tracking. While it lacks the premium build materials of more expensive units, the sound quality it produces punches far above its weight class.
- Best for: Absolute beginners and traveling musicians.
- Standout Feature: Unbeatable price-to-performance ratio.
3. PreSonus Studio 24c
For those who want a polished, professional feel, the PreSonus Studio 24c delivers. It features a rugged metal chassis, MIDI input/output, and striking LED meters on the front panel that make setting your gain levels a breeze. It also comes bundled with Studio One Artist, giving you a powerful DAW right out of the box.
- Best for: Electronic musicians and users who need precise visual metering.
- Standout Feature: High-resolution front-panel LED metering.
4. Behringer U-Phoria UMC204HD
Behringer has revolutionized the budget gear market, and the UMC204HD is a prime example. This interface boasts MIDAS-designed preamps and multiple routing options, including four line outputs and MIDI I/O. It provides exceptional flexibility if you plan to incorporate outboard gear or external synthesizers into your mixing and mastering process.
- Best for: Producers with external hardware and synthesizers.
- Standout Feature: Extensive routing options and inserts for external effects.
5. Audient iD4 MKII

The Audient iD4 MKII bridges the gap between budget and high-end professional gear. It features the exact same Class-A mic preamp found in Audient’s large-format recording consoles. The JFET instrument input is specifically designed to replicate the input stage of a classic valve amplifier, adding a beautiful warmth to electric guitars and basses.
- Best for: Guitarists and solo vocalists seeking premium tone.
- Standout Feature: Console-grade preamps and ScrollControl functionality.
Feature Breakdown: Comparison Table
To help you visualize the differences, here is a structured comparison of our top picks:
|
Interface |
Inputs/Outputs |
Max Resolution |
MIDI I/O |
Best Use Case |
|---|---|---|---|---|
|
Focusrite Scarlett 2i2 |
2 In / 2 Out |
24-bit/192kHz |
No |
Singer-songwriters |
|
M-Audio M-Track Duo |
2 In / 2 Out |
16-bit/48kHz |
No |
Extreme budget setups |
|
PreSonus Studio 24c |
2 In / 2 Out |
24-bit/192kHz |
Yes |
Electronic production |
|
Behringer UMC204HD |
2 In / 4 Out |
24-bit/192kHz |
Yes |
Hardware routing |
|
Audient iD4 MKII |
2 In / 2 Out |
24-bit/96kHz |
No |
Premium vocal/guitar tone |
Crucial Features to Consider Before Buying
Finding the best budget audio interface for home studio recording requires understanding a few key technical specifications. Here is what you need to look out for.
Input and Output (I/O) Needs
Count your instruments. If you only record your voice and an acoustic guitar, a 2-input interface is perfectly sufficient. However, if you plan to record a live drum kit or a multi-synth setup, you will need an interface with more inputs, or one that features an ADAT optical connection for future expansion.
Preamp Quality and Phantom Power
Preamps boost the quiet signal from your microphone to a usable level. Cheap preamps introduce “hiss” or noise. Look for interfaces with a reputation for clean, low-noise preamps. Additionally, ensure the interface provides 48V phantom power—a strict requirement if you plan to use condenser microphones for your vocal recording techniques.
Latency and Direct Monitoring
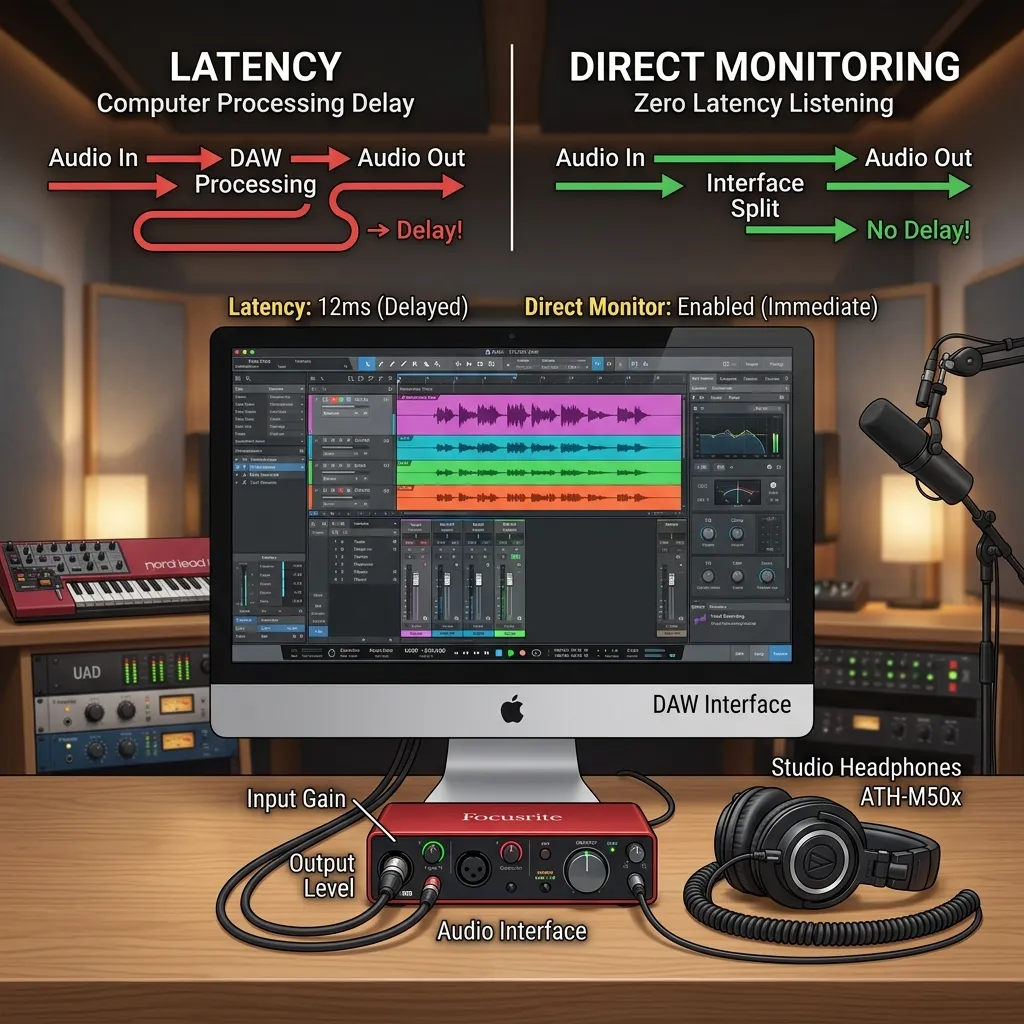
Latency is the delay caused by your computer processing the audio. High latency makes it impossible to record rhythmically. Look for an interface that connects via USB-C or Thunderbolt for faster data transfer. Furthermore, a “Direct Monitor” switch is invaluable; it routes the audio directly from the input to your headphones, bypassing the computer entirely for zero-latency monitoring.
Bit Depth and Sample Rate
You will often see numbers like 24-bit/192kHz. Bit depth dictates the dynamic range (the difference between the quietest and loudest sounds), while sample rate determines how many times per second the audio is captured. For modern music, 24-bit is the industry standard. A sample rate of 44.1kHz or 48kHz is perfectly adequate for high-quality home recordings, though many budget units now support up to 192kHz.
Common Mistakes to Avoid When Building Your Setup
Even with great equipment, user error can ruin a recording. Avoid these common pitfalls:
- Ignoring Acoustic Treatment: An expensive interface cannot fix a bad-sounding room. Hanging acoustic panels or even heavy blankets can drastically improve your sound by reducing room echo and flutter echo.
- Recording Too Hot: Pushing your input gain until the meter hits red (clipping) results in harsh digital distortion that cannot be removed later. Always leave “headroom” by keeping your loudest peaks in the green or yellow zones.
- Using the Wrong Cables: Unbalanced or cheap cables introduce ground hum and radio interference. Always use high-quality, balanced XLR and TRS cables to connect your gear.
- Neglecting Driver Updates: Manufacturers frequently release software updates to fix bugs and improve performance. Failing to update your interface’s drivers can lead to crashes, audio dropouts, and frustrating DAW integration issues.
Pro Tips for Maximizing Your Audio Interface
You do not need a million-dollar facility to produce incredible tracks. Use these expert strategies to get the most out of your gear.
Gain Staging is Everything
Proper gain staging ensures your signal is strong enough to avoid background noise but quiet enough to avoid clipping. Aim for an average input level around -18dBFS to -12dBFS in your DAW. This gives your plugins plenty of dynamic range to operate smoothly.
Utilize Direct Monitoring for Vocals
When recording singers, any delay in their headphones can throw off their pitch and timing. Always use the hardware direct monitoring feature on your interface during vocal tracking. You can add a touch of reverb from your DAW for vibe, but keep the core vocal signal zero-latency.
Manage Your Buffer Size
Learn how to adjust your DAW’s buffer size. When you are recording, set the buffer size as low as possible (e.g., 64 or 128 samples) to minimize latency. When you transition to mixing and start adding CPU-heavy plugins, raise the buffer size (e.g., 1024 samples) to give your computer breathing room and prevent audio dropouts.
Master Your Environment
Place your interface on a stable, flat surface away from power strips or heavy magnetic fields to avoid electrical interference. Keep your cables organized and separated—do not run power cables parallel to your audio cables.
By integrating these practices with your studio monitor placement, you will achieve a clean, accurate listening environment that translates well to any speaker system.
Conclusion
Building a capable recording space is an exciting journey, and choosing the right gear is your most critical decision. Whether you opt for the pristine preamps of the Audient iD4 or the unbeatable value of the M-Audio M-Track Duo, upgrading your hardware will fundamentally transform your sound. Now that you know how to identify the best budget audio interface for home studio recording, it is time to plug in and start creating. Grab your chosen interface today, set up your mics, and let your creativity flow!
FAQs
1. What is an audio interface?
An audio interface is a piece of hardware that connects your microphones and instruments to your computer. It converts analog audio signals into digital data so your computer can process them, and turns digital audio back into analog so you can hear it through your speakers or headphones.
2. Can I just use my computer’s built-in sound card instead?
While you can use a built-in sound card, it is not recommended for serious recording. Standard sound cards lack the necessary inputs for professional microphones, do not provide phantom power, and introduce significant latency and background noise into your recordings.
3. Do I need an interface if I only use a USB microphone?
No, a USB microphone has a small interface built directly into it. However, an external audio interface provides far better sound quality, lower latency, and the flexibility to upgrade to higher-quality XLR microphones in the future.
4. What does phantom power (48V) do?
Phantom power sends a 48-volt electrical current through an XLR cable to power active electronic components inside condenser microphones. Without it, condenser mics will not capture any sound. Dynamic microphones and ribbon mics generally do not require phantom power.
5. How many inputs do I actually need?
It depends on your workflow. If you only record vocals or a single instrument at a time, 1 or 2 inputs are fine. If you want to record a podcast with multiple guests, track a drum kit, or record a full band live, you will need an interface with 4, 8, or more inputs.
6. What is the difference between a mic input and a line input?
A mic input is designed to accept very quiet signals from microphones and route them through a preamp to boost the volume. A line input is designed for signals that are already at a higher, standard level, such as the output from a synthesizer or an external preamp.
7. Does the interface affect my computer’s CPU performance?
Standard budget interfaces rely on your computer’s CPU to process audio and plugins. However, a good interface with optimized drivers will process audio much more efficiently than a generic sound card, allowing you to run more plugins with fewer glitches.
8. What is direct monitoring?
Direct monitoring is a feature that routes the audio signal from your inputs directly to your headphone outputs before it travels to your computer. This allows you to hear exactly what you are recording in real-time, completely eliminating the delay (latency) caused by computer processing.
9. Can I use a budget interface to record professional-quality music?
Absolutely. Modern budget interfaces feature preamps and digital converters that were considered high-end just a decade ago. If you pair a budget interface with a decent microphone, proper acoustic treatment, and good mixing techniques, you can easily produce radio-ready tracks.
10. Do I need a Mac or a PC for these interfaces?
Most modern audio interfaces are compatible with both Mac and PC. They typically connect via USB and come with downloadable drivers for Windows, while often functioning as “plug-and-play” on macOS. Always check the manufacturer’s system requirements before purchasing.


Leave a Reply